How To Verify You Have the Proper Robots.txt File

This article was last updated on 5/17/21
If you have a website or are involved in online marketing, you’ve likely heard about the robots.txt file. When implemented incorrectly, this file can have very negative and unintended consequences, such as blocked pages and resources. Imagine trying to rank for a keyword on a page that Google can’t access. In this article, we will cover details including why a robots.txt file is important, how to access a robots.txt file, and much more!
Table of Contents
- What is a Robots.txt File & Why is it Important?
- How to Access a Robots.txt File?
- What Should a Robots.txt File Look Like?
- How to Check if your Robots.txt File is Working or Not
- How to Create a Robots.txt File that is Simple and SEO-Friendly
What is a Robots.txt File and Why is it Important?
A robots.txt file allows search engine crawlers to better understand what parts of your website you do and do not want them to crawl. It is the very first location of your website a search engine will visit.
Why is it important?
- It prevents duplicate content from showing in the SERPs.
- You have more control over what you want a search engine to see or not see.
- A sitemap can be added directly into the robots.txt file helping search engines to better read and understand the blueprint of your website.
- Helps to prevent certain pages, images, files, etc. from being indexed and taking up crawl budget space.
- If you have multiple content pieces that load at once, setting a crawl delay in the file can help servers from being overloaded.
How to access a robots.txt file
If you’re not sure whether your website has a robots.txt file, it’s easy to check! Access your robots.txt file by adding /robots.txt at the end of your domain. Here’s an example of ours at Boostability: https://www.boostability.com/robots.txt
If you don’t see anything when you try this out for your website or are taken to a 404 error page, you don’t have one. The next step would be to prioritize creating a robots.txt file for your website!
What Should a Robots.txt File Look Like?
At the very minimum, a robots.txt file should contain three main parts and concept you need to understand.
User-agent

This command dictates which crawlers are allowed to crawl your website. Websites most commonly use * for the user-agent because it signifies “all user agents.”
With the rise of new search engines entering the market and depending on your location, the list of search engine user-agents can get long. Below is a list of some of the main search engine user agents:
- “Googlebot” for Google
- “Bingbot” for Bing
- “Yahoo! Slurp” for Yahoo
- “Yandex” for Yandex
- “Baidu” for Baidu
- “Duckduckgo” for DuckDuck Go
- “Aolbuild” for AOL
If you wanted to give a command for a specific crawler, you would place the user-agent ID in the user-agent location. Each time you refer to a crawler, you would need a separate set of disallow commands.
For example, you list Googlebot as the user-agent and then notify the crawler what pages to disallow.
Most reputable crawlers, like Google, Bing, and Yahoo, will follow the directive of the robots.txt file. Spam crawlers (that usually show up as traffic to your website) are less likely to follow the commands. Most of the time, using the * and giving the same command to all crawlers is the best route.
Disallow

This command lets crawlers know which files or pages on your website you do not want them to crawl. Typically, disallowed files are customer-sensitive pages (like checkout pages) or backend office pages with sensitive information.
Most problems in the robots.txt occur within the disallow section. Issues arise when you block too much information in the file. The example above shows an appropriate file to disallow. Any files that begin with /wp-admin/ will not be crawled.
The example below is what you do not want to include in the disallow section.

What is the disallow command telling the crawlers in the picture above? In this situation, the crawlers are told not to index any of the pages on your website. If you want your website visible in the search engines, then including a single / in the disallow section is detrimental to your search visibility. If you notice a sudden drop in traffic, check your robots.txt file first to see if this issue is present.
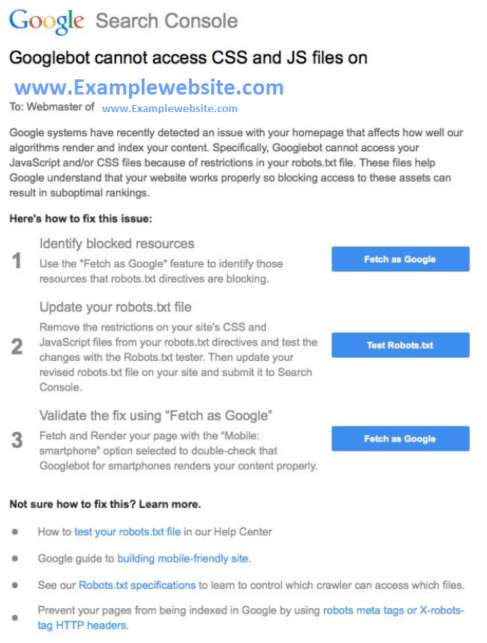
Google even sends out Search Console messages letting websites know if the robots.txt file blocks information it needs to crawl, like CSS files and Javascript.
If you want to lean on the safe side, let all crawlers crawl every page on your website. You can do this by not disallowing anything.

As you can see, the disallow command is followed by a blank space. When a search crawler sees this, it will go ahead and crawl all pages it finds on your website.
Sitemap
A robots.txt file can also include the location of your website’s sitemap, which is highly recommended. The sitemap is the second place a crawler will visit after your robots.txt file. It helps search engines better understand the structure and hierarchy of your website. Make sure the sitemap lists your webpages, specifically the ones you are trying to market or your most valuable pages.
Note: If you have multiple sitemaps for your website, add them all into the robots.txt file – you can list out more than one.
How to Check if your Robots.txt File is Working or Not
It’s a good practice to check if the robots.txt file for your website is working or not using your Search Console account. Use this tool to test your robots.txt file or individual URLs when in doubt.
Below is a screenshot of what it looks like. You just need to input your robots.txt file or the specific URL you want to test and it will tell you whether it’s accepted or blocked.
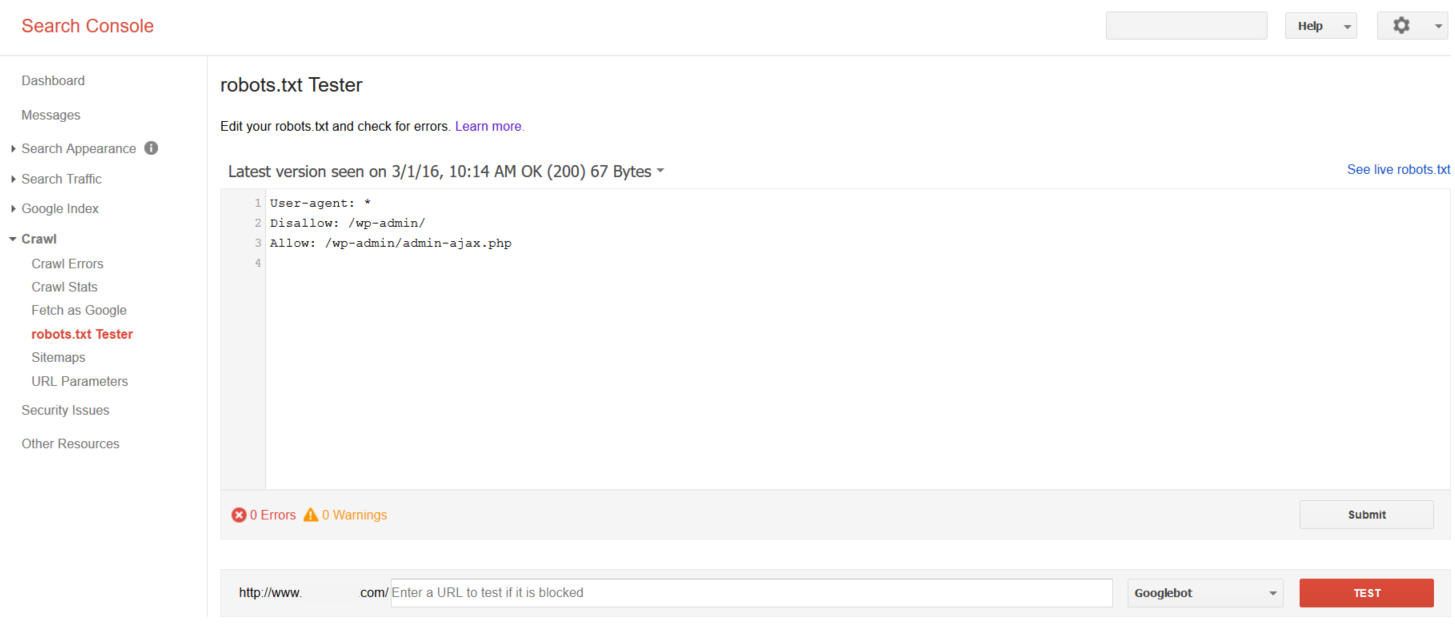
If there are any problems or errors with the robots.txt file for your website, Search Console will let you know. Remember that a search engine’s role is to a) crawl, b) index, and c) provide results.
The robots.txt file can block pages and sections that a search engine should crawl but not necessarily index. For example, if you create a link and point it to a webpage, Google could crawl that link and index the page that the link points to. Any time that Google indexes a page, it could show up in a search result.
If you don’t want a webpage to show up in a search result, include that information on the page itself. Include the code <meta name=”robots” content=”noindex”> in the <head> tags on the specific page you don’t want search engines to index. Or you can add a list of pages to be noindexed directly in the robots.txt file, keep reading to learn how.
How to Create a Robots.txt File that is Simple and SEO-Friendly
In case you don’t have a robots.txt file for your website, not to worry because you can make one! For this purpose, we will show you how to create an SEO-friendly robots.txt file in a few simple steps.
We recommend getting some assistance from a trusted web developer if you need it because this does require working within the website’s source code.
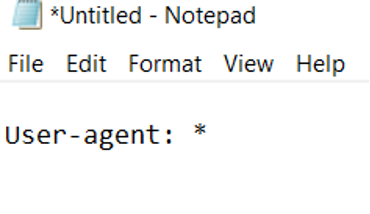
1. Use a plain text editor
For a Windows, use Notepad; for a Mac, use TextEdit. Avoid using Google Docs or Microsoft Word because they can insert code that you don’t intend to have in the file.
2. Assign a user-agent
As we mentioned above, most sites will typically allow all search engines to access their websites. If you choose to do this, simply type in:
User-agent: *
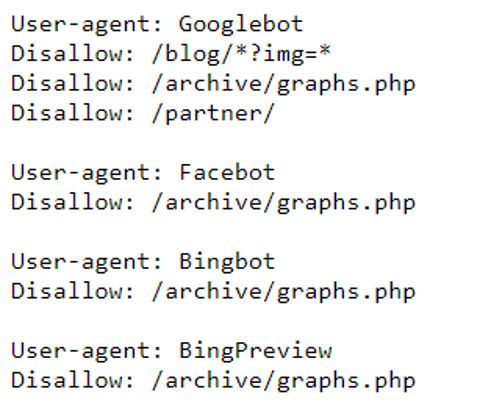
If you want to specify rules for different user-agents, you will need to separate the rules into multiple user-agents. For example, let’s take a look at SEMrush’s robots.txt file below:
They have listed out specific rules for different user-agents. SEMrush has a specific rule for Google’s user-agent compared to the pages it doesn’t want Bing’s user-agent to crawl. If you find yourself in a similar situation, follow the structure above and separate the rules into separate lines in your plain text editor.
3. Specify the disallow rules
To keep it as simple as possible for this scenario, we will not add anything to the disallow. Or you can choose to not include a disallow section and just leave in the user-agent rule. This means that search engines will crawl everything on the website.
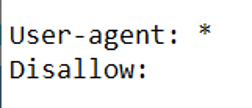
To make your robots.txt file even more SEO-friendly, adding pages that site visitors don’t typically engage with into the disallow section is a good practice because this can help clear up the crawl budget. An example for a WordPress site would be:
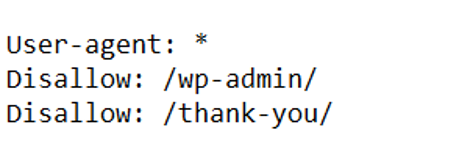
The picture above demonstrates that WordPress admin pages (or backend pages) should not be crawled by any user-agent, in addition to the Thank You page (this ensures that only qualified leads will be accounted for, not accidental visitors that can access the page through a SERP). By filtering these kinds of pages from the crawl budget, you can put more attention into the valuable pages you want search engines to crawl and people to visit.
4. Add your sitemap
Last but not least, don’t forget to add your sitemap(s) as you finish creating your robots.txt file. List it out at the bottom after the Disallow section.

5. (Optional) Noindex pages within the robots.txt
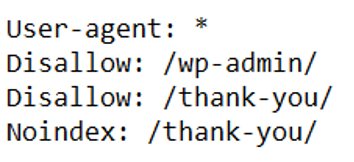
This isn’t a necessary step, but it can be useful to add a noindex section to your robots.txt. As mentioned earlier, the robots.txt does not automatically noindex pages. It just tells search engines which ones to not crawl. If you have certain pages that you don’t want to be indexed (i.e. Thank You or Confirmation pages), you can update the meta tag on the page directly or add it to the robots.txt file as shown in the example below:
6. Submit it to the root directory
Once you’re finished creating your robots.txt file, the last step is to upload it into the root directory of your website. Once it’s uploaded, navigate to your robots.txt file and see if the page loads on the search engine. Then test out your robots.txt file using Google’s robots.txt tester tool.
Make Your Robots.txt File SEO-Friendly
The robots.txt file is certainly a more technical aspect of SEO, and it can get confusing. While this file can be tricky, simply understanding how a robots.txt file works and how to create one will help you verify that your website is as visible as possible. It’s a powerful tool that can be used to take your SEO strategy even further.
But if you need help with your robots.txt file or any other part of the SEO campaign, we’re here to help! Boostability helps small businesses boost their SEO campaigns, increase online visibility, and stay relevant against other competitors. Let us help you take your SEO strategy to the next level!

