
How to Make the Most of the New Google Business Profile Dashboard

The digital world is ever-evolving, and Google Business Profile is no exception. Recently, Google has revamped its dashboard, bringing forth a new look and feel that may have left business owners and marketers feeling a little disoriented.
While change can be daunting, it’s essential to adapt and make the most of the latest developments in online marketing tools.
In this blog post, we’ll guide you through the ins and outs of the new Google Business Profile optimization for its new dashboard, also known as the New Merchant Experience dashboard, from locating essential features and understanding the most impactful changes to exploring the benefits of this updated tool.
Understanding the New Dashboard: Key Differences and Updates
Redesigned interface
The new Google Business Profile (GBP) dashboard offers a cleaner and more intuitive interface, making it easier to navigate and access key features. The improved analytics and insights help you better understand your customers’ behavior and preferences, which is crucial for effective Google Business Profile optimization.

Performance Insights Dashboard

As with any update, the new Google Business Profile dashboard comes with some changes that may affect the way businesses monitor their performance. In line with its Deprecation schedule, Google has removed certain data insights that were previously available. These include:
- Post views and clicks data
- Query volumes are categorized as direct, brand, and discovery
- Views for both business-owned and user-uploaded photos
Consequently, businesses will need to adapt to the lack of visibility into the performance of their posts and photos.
In the previous version of Google Business Profile, the photo analytics section allowed business owners to see the number of views each photo on their profile received, as well as a comprehensive monthly photo report.
Similarly, the posts analytics section provided insights into the number of views and clicks a post garnered.
It’s essential to be aware of these changes and adapt your strategies accordingly to maximize the platform’s potential for your business’s growth. and ensure successful Google Business Profile optimization.
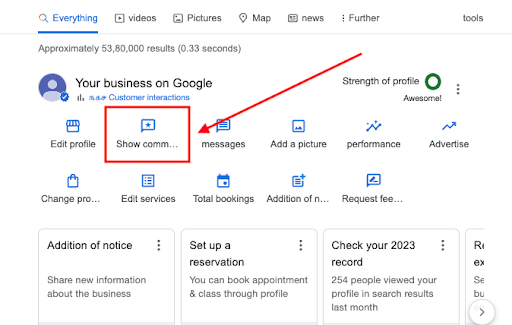
Messaging Feature
The messaging feature in Google Business Profile allows customers to communicate with you directly, making it easier for them to ask questions or resolve issues.
Responding to customer queries promptly and professionally can help build trust and improve your overall reputation and will play a significant role in your overall Google Business Profile optimization strategy.
Call History
The new call history feature helps you track and analyze customer calls through your listing. Identify peak call times, adjust your strategy, and improve customer service by understanding call trends.
Easier Access to Reviews
Managing reviews is now easier with a centralized location for all your feedback. Respond to reviews quickly and efficiently to monitor and maintain your online reputation.
Enhanced Posting Capabilities
GBP now offers enhanced posting capabilities to share news, events, promotions, and updates. Improved scheduling and post management, along with eye-catching visuals and CTAs, will help you increase customer engagement.
Practical Tips to Maximize the New Google Business Profile Dashboard
Claim and Verify Your Google Business Profile
In today’s digital business landscape, Google My Business Profile creation is essential for increasing visibility and credibility. There are multiple methods to accomplish this, such as using a postcard or video verification.
Using a postcard to claim to verify your Google Business Profile is a simple process. When you request verification, Google will send you a postcard containing a unique verification code.
Once you receive the postcard, follow the instructions to enter the code in your Google Business Profile to complete the verification process. Keep in mind that the postcard may take up to 14 days to arrive.
Alternatively, you can use video verification, which is another effective method.
Here are the steps to effectively complete the video verification process for your Google Business Profile.
- Begin by logging in to your Google account and searching for your business name.
- Click on the three dots next to your business name and select ‘Help and Support.’
- From there, scroll down to ‘Contact us,’ choose your business, and type ‘verification’ in the search field.
- Click ‘Next’ and select ‘Fix postcard issue.’
- Following the prompts, email Google Support, providing all the required information.
Depending on where you’re based, Google will require different documentation for verification.
It’s essential to understand that there are two methods of video verification:
- Live video verification, where you schedule a live call and walk through your business premises with a Google representative using your smartphone, and
- Pre-recorded video verification, where you record a video following Google’s instructions and upload it for verification.
Ensure you complete the video verification process within a week to avoid losing the option. To make the process as seamless as possible, prepare your business for verification in advance before applying for help.
For home-based businesses, make sure your address number is visible, display your workspace with invoices, business cards, and other branded items, and if you have a service vehicle, park it in the driveway with visible logos and graphics.
For commercial locations, display clear signage on the door, awning, or window, show your office suite number and company logo, and have business cards, invoices, and other branded items readily available.
By following these connected and smoothly flowing steps, you can successfully complete the video verification process for your Google Business Profile.
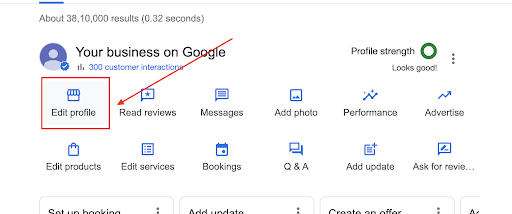
Complete Your Business Profile
Ensuring that your company’s information is accurate, up-to-date, and consistent across all platforms is crucial for maintaining a professional online presence. This is an important part of Google Business Profile optimization.
To update your business information on the New Merchant Experience dashboard, click “Edit Profile” and then “Business Information.”
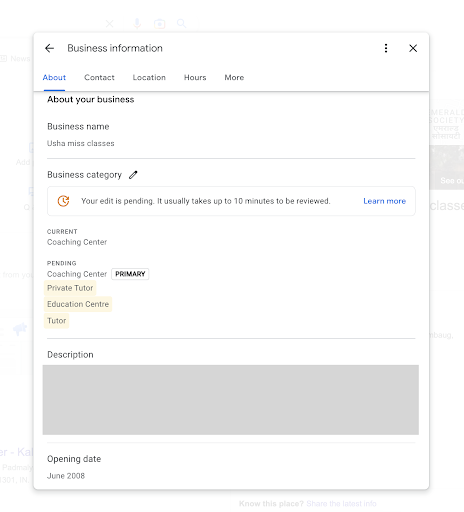
Here you can edit different attributes like:
- Your Business Name
- Category
- Description
- Contact info
- Location details and more
Ensure that you also include any special hours, such as holiday closures, to avoid any confusion.
Here are some tips to set up and optimize your categories and attributes in the new Google Business Profile Dashboard to improve your business’s visibility on Google.
- Choose the right primary category: The primary category is the top-ranking factor for your Google Business Profile. To select the correct one, search for businesses in your industry and location, and note the primary category they use. For example, if you own a bakery, use “Bakery” instead of “Baked Goods Store” or “Pastry Shop.”
- Understand the importance of secondary categories: Secondary categories won’t significantly impact your ranking, but they can provide potential customers with more information about the services or products you offer.
- Optimize your category on your website: If you offer IT consulting services, ensure that the primary category, “IT Consulting Services,” is mentioned in a prominent heading on your website, such as in the homepage title or a key section. Google will match this with your Google Business Profile, which can boost your ranking.
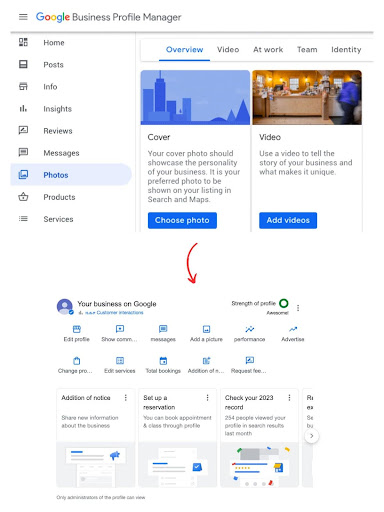
Add Photos and Videos
Uploading high-quality images and virtual tours of your business can give potential customers a better understanding of what you offer and entice them to choose you over others.
What if Google My Business Profile rejects your photos?
It can be quite frustrating when Google My Business Profile rejects your uploaded photos. Understanding the common reasons behind these rejections can help you address the issues and successfully upload your images. Here are some common reasons for photo rejections:
- Unsuitable content: Google disallows images that contain harmful or offensive material. Adhere to Google’s guidelines concerning acceptable content for your photos.
- Ownership rights issues: Google’s AI can identify when you don’t possess the rights to an image. Make certain you have legal permission to use all the images you upload.
- Poor image quality: Google strives to offer an optimal user experience, so images that are blurry or of low quality could be rejected. Make sure to upload only high-quality photos.
- Improper image dimensions: Images smaller than 300 pixels might be rejected. Verify that your images comply with Google’s sizing guidelines.
- Excessive photo uploads: Submitting a vast number of photos at once may cause the algorithm to reject them. Opt for uploading images in smaller increments or every few days.
- Excess text: Images containing too much text, including URLs or phone numbers, may be rejected. Refrain from adding an overload of text or positioning it too close to the photo edges.
- Technical glitch: Occasionally, photos might be rejected for no apparent reason. In such cases, attempt to upload the same image again after 24 to 48 hours.
Leveraging Insights and Analytics
Google Business Profile offers valuable insights and analytics to help you understand how users are interacting with your profile.
You can use the data from your Google Business Profile insights to refine your local SEO strategy. Identify trends and patterns in user behavior, such as popular search terms, peak traffic times, or frequently asked questions, and adjust your profile and content accordingly.
If you need additional help with your Google Business Profile, consider reaching out to Google Business Profile support. They can provide guidance on advanced optimization techniques, troubleshoot issues, and offer recommendations for improving your profile.
Respond to Reviews
When you respond to your reviews, respond using keywords you want the listing to rank for.
For example, let’s say you’re a software development company and have just received a review from one of your clients for custom software development.
You can respond to the review by saying something like, “Thank you for leaving your review. We’re happy to have provided the custom software development services for your business. Don’t hesitate to reach out if you need further assistance or additional features.”
By doing this, you’ve included the keyword ‘custom software development’ in the response. Google My Business picks up these keywords, and it will help the business listing rank higher on Google.
Add Products to Google My Business
Adding your products and services to your Google My Business listing is a great way to instantly show your customers what you do without them having to delve deeper into your website.
- Open the “Products” editor:
Click on the “Products” card in the main dashboard area to access the product management interface.
- Create a new Product Collection:
Click on the “Add Product Collection” button to create a new collection for your products. A collection is a group of related products that you can showcase together. This helps you organize your products better and makes it easier for customers to find what they’re looking for.
- Name your Product Collection:
Give your new Product Collection a name that accurately describes the group of products it will contain. This name will be visible to potential customers browsing your GMB profile, so make sure it is clear and enticing.
- Add Products to the Collection:
Click on the “Add Product” button within the new collection to start adding individual products. You’ll need to fill in the following information for each product:
- Product Name: Enter a clear and concise name for your product.
- Product Category: Choose the appropriate category for your product from the dropdown menu.
- Product Description: Provide a brief description of the product, highlighting its key features and benefits.
- Product Price: Indicate the price of the product or a price range, if applicable.
Product Image: Upload a high-quality image of your product that accurately represents it. Ensure the image is clear, well-lit, and free of any distractions or clutter.
- Save and Publish:
Once you have added all the necessary information, click on the “Save” button to save the product details. After saving, click “Publish” to make the new Product Collection and its contents visible on your GMB profile.
- Add More Collections and Products:
You can create multiple Product Collections to showcase a wide range of products.
Now when you Google your company name, you’ll see the product under your Google My Business listing, making it easier for your customers to take action from there.
Add Multiple Locations
Adding multiple locations to your Google My Business (GMB) profile is essential for businesses with more than one physical location. However, you need to be careful that you create this duplicate listing correctly so that you don’t get suspended.
Follow these steps to add additional listings without risking suspension:
- Initiate Adding a New Business Profile:
Click on the three dots in the top-right corner and select “Add a new Business Profile” from the dropdown menu.
- Maintain Consistent Business Name and Category:
When creating the new listing, ensure the business name and primary category are identical to your existing listing to maintain consistency across your GMB profiles.
- Specify the Absence of a Physical Address (if applicable):
If your business does not have a physical address or you prefer not to display it, select “No” when prompted.
- Provide a Unique Address for the New Listing:
If your business has a separate physical location, enter the unique address for the new listing.
Pro-tip: For the website section of your new listing, consider creating a location-specific sub-page on your website that includes the city name in the title. This approach can enhance your local presence on Google and potentially improve your ranking for location-based searches.
Utilize the New Messaging Feature
To set up messaging and notifications, follow these steps:
- Log in to your Google Business Profile account.
- Click on “Messages” in the left-hand menu.
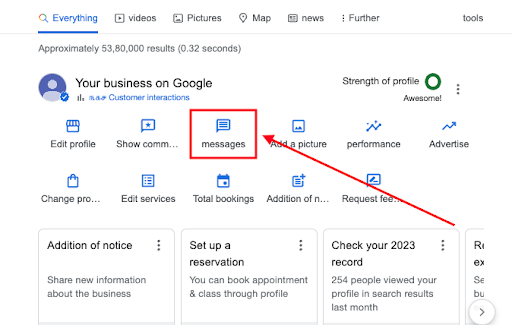
- Turn on the messaging feature and provide your preferred contact information.
- Customize your notification settings to ensure you receive alerts when a new message is received.
Here are a few tips to provide excellent customer service through the messaging feature:
- Respond to messages as quickly as possible, ideally within a few hours.
- Be professional, courteous, and helpful in your responses.
- Use clear and concise language to answer questions or address concerns.
- Offer solutions or alternatives when appropriate to resolve issues.
Utilizing Google Posts for Promotions and Events
Google Posts are a feature that allows you to share updates, promotions, events, and news directly on your Google Business Profile. These posts can include text, images, and even videos, making them an engaging way to connect with potential customers.
To create a Google Post, follow these steps:
Access the Updates section: In the new dashboard, locate the “Addition of notice” tab at the top of the page and click on it to access the Posts section.
Choose the post type: Depending on your needs, select a post type such as “Notice,” “Event,” or “Offer.”
- Add content to your post: Fill in the required fields with relevant information, such as a catchy title, description, start and end dates, or promotional codes. Be concise and clear with your message.
- Include visuals: Upload a high-quality image or video to make your post more engaging. Ensure that the visuals are relevant to your promotion or event and meet Google’s guidelines for acceptable content.
- Add a call-to-action (CTA): Include a CTA button like “Book,” “Order Online,” “Learn More,” or “Sign Up” to encourage users to take action. Make sure to link it to the appropriate page on your website.
- Preview your post: Before publishing, preview your post to ensure that it looks professional and visually appealing.
- Publish your post: Once you’re satisfied with your post, click on the “Publish” button to make it live. Your post will now appear on your Google Business Profile in search results and on Google Maps.
To make the most of your Google Posts, follow these best practices:
- Keep your posts relevant and timely, focusing on current promotions, events, or news.
- Use high-quality images or videos to make your posts more visually appealing.
- Include a clear call-to-action, such as “Learn More,” “Book Now,” or “Shop Now.”
- Regularly update your Google Posts to keep your audience engaged and informed.
Conclusion
Optimizing your Google Business Profile is crucial for improving your online visibility, attracting potential customers, and building trust with your audience. By following the strategies outlined in this blog post, you can make the most of the new Google Business Profile dashboard and its features to enhance your local SEO efforts.
Remember, a well-optimized profile can significantly impact your visibility on Google, leading to increased traffic, conversions, and, ultimately, success.